In Which I Attempt to Keep Up My Blog While Starting a Business

Stoneledge Farm began our CSA deliveries this week, which means that summer is essentially here. As usual, week 1 was full of leafy greens, and also a helping of rhubarb. It all feels very familiar and comforting.

But something IS different this year: I am in the process of starting a business, the Astoria Bookshop (scheduled to open in mid-August). Which means that I have considerably less time to spend in the kitchen, but also considerably more reason to appreciate the fresh and very cheap produce that I’ve come to love. For the time being, life as an entrepreneur is awfully busy but in a somewhat flexible way. Since the store isn’t yet open for business, I can choose to go to a networking event at a karaoke bar on Friday afternoon, and then spend a Saturday afternoon baking a tart before heading out to look at a table someone is selling on Craigslist.

About that tart: like I said, we got rhubarb this week. We never get very MUCH rhubarb from the farm, but one advantage of being a Core Group member–and also helping clean up at the end of our distribution period–is that you can sometimes snag extras of things that you especially like. So I managed to get enough rhubarb to bake a pie. Then I grabbed a couple of pints of strawberries from one of the produce carts in the neighborhood (their stuff is usually slightly overripe, but/and it’s also incredibly cheap). And then I looked for a solid recipe.

It turns out that strawberry-rhubarb pie is so pedestrian that none of my contemporary cookbooks bother to include a recipe. Luckily, I have a my grandmother’s 70-year-old copy of The Joy of Cooking to fall back on.

I started with my sister’s (not technically) patented instant pie crust recipe, using coconut oil instead of olive oil. It’s stupidly simple–mix flour, salt, a little sugar, oil, and water together with a fork, and press it into a pan with your hands.

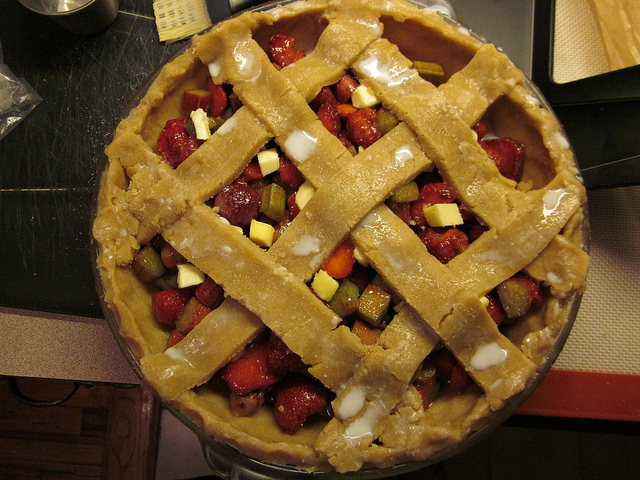
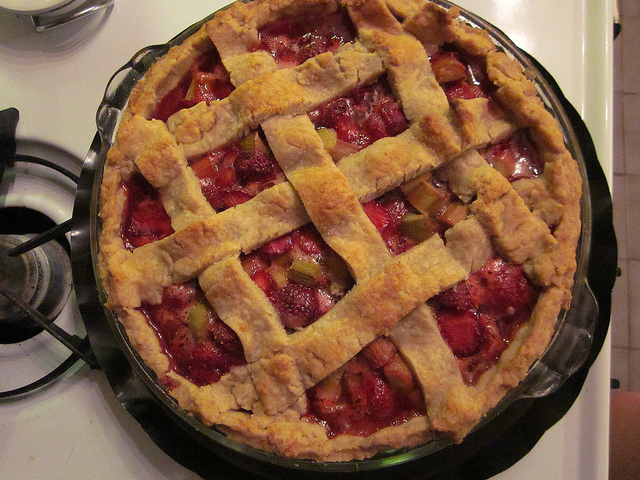
Then, two small bundles of rhubarb + 1 pint of strawberries, mixed with sugar, flour, cornstarch, lemon juice, and cinnamon. Pour it in the crust:

image

Bake at 450F for 10 minutes, then at 350F for another half an hour.
image

The lesson of the day is that 4 generous cups of fruit is maybe a little much for a shallow 9″ tart pan. But I was smart enough to put a baking sheet underneath, so the fruit juices that overflowed are not crusted on the bottom of my oven. AND I now have a freshly made strawberry-rhubarb pie to enjoy. Hallelujah! Summer may now begin.

Pie for Dinner

I would like to pretend that this mushroom cabbage galette from Deborah Madison is some kind of health food. I mean, it’s cabbage! And mushrooms are good for you! And you can totally use low-fat sour cream and even I will not scoff. But let’s not kid ourselves. Galette = pie. Plus, Smitten Kitchen has made this before, and you know how she feels about healthy food. And there’s the bit at the end where you dump a load of melted butter on top of everything. So let’s abandon these virtuous fantasies and get with the cooking.

Start with the dough–I went with a yeasted tart dough (much simpler than it sounds), though DM suggests an alternative galette dough that’s basically just pie crust. 

While it rises (or chills, depending on what kind you’re making), saute a diced onion and some sliced shiitake mushrooms, with thyme, tarragon, & dill in a good amount of butter. 

Img_1685

When they’re soft, add a big pile of thinly sliced cabbage, a bit of salt, and a half cup of water. Cook, covered, until the cabbage is tender.

Img_1686

At this point, the recipe instructs you to add water and then raise the heat to cook it all off, ending with a relatively dry pan of veggies. I would recommend NOT adding any more water–just cook off whatever is left in the pan when you take the lid off. Turn off the heat, then stir in a pile of chopped parsley, a chopped hard-boiled egg, and some sour cream. Splash in a little vinegar (white wine is fine if you don’t have tarragon, as called for) and season with & salt and pepper.

Img_1687

Set the oven to 400F. By this time, your dough should be properly risen or chilled. Roll it out into a big, thin circle. Another instruction I don’t entirely agree with: place the rolled-out dough on the BACK of a sheet pan. Then pile the filling into the center, in a circle about 7 or 8 inches across, and fold the edges of the dough up over it. Brush the whole thing with a couple tablespoons of melted butter and bake for 25-30 minutes. 

Img_1688

The reason I would suggest putting the galette on the normal side of a sheet pan can be seen above. If you are not 100% expert at rolling out dough without holes; if you were not 100% thorough in making sure all the water was cooked out of the filling; and if you are maybe a bit sloppy in brushing on the melted butter: all of these are reasons to want a pan with sides. But guess what? I know who cleans the oven.

Img_1689

And your galette will not suffer from it, even if your oven does.

Img_1690

The galette gets served with horseradish sauce. You can probably buy some, or make it yourself with a mixture of sour cream, grated horseradish, chives, some sugar, and a tiny bit of salt & white wine vinegar. 

Un-Birthday Pie

“American as apple pie” is a phrase that never sounded right to me. Perhaps that’s because I don’t bake apple pie. See, my favorite apple pie is nothing like the traditional American version. My birthday pie (I’m not a cake girl) has a sour cream base, and a brown sugar crumble topping, and I’ve never even TRIED to make it myself. That is my mom’s job, and she does it beautifully every year. She’s mailed it to me at college, packed it in suitcases, driven it from Philly to Manhattan to deliver it to my birthday party only to turn around and drive back home, and snuck it past airport security so we could have a pre-flight treat. 

The other week, after having had my fill of MY pie, I had some apples on my counter that needed to be used up, and I was getting a little tired of applesauce. Luckily, P. gave me an excellent excuse to make a pie, in the form of an “occupie” party (get it?). So I flipped through a few cookbooks and discovered a recipe from Maury Rubin, the guy behind the City Bakery, for an Indian pudding apple pie. 

Img_1445

The crust is pretty standard, though I followed my mom’s lead and used apple cider in place of water in the crust. The filling, meanwhile, is molasses based, with a good amount of cinnamon and ginger. Whisked together, before tossing in the apple slices (Golden Delicious), it has the same glossy, luxurious look of melted chocolate.

Img_1447

The topping, meanwhile, has got cornmeal, flour, and brown sugar, mixed with butter and a little cream. The recipe specifically calls for coarsely ground cornmeal, which is the one thing I would change. Given the preparation, the grains stayed a little too crunchy for our taste, which might not have been the case if I’d used a medium grind.

Img_1446

In any case, pour the apple mixture into the crust, and top with the cornmeal mixture.

Img_1448

Bake it for a half an hour, then cover with foil and bake another half an hour. 

Img_1452

Et, voila.

Img_1453

Make no mistake, this is an intense pie. It’s also kind of runny. I was hoping it would set up a little better than it did. No complaints about flavor, though.

Img_1457

Tastes Like Purple

Are you one of those people who thought that grape juice and grape jelly were, like watermelon Jolly Ranchers and Sour Apple Pucker, completely artificial? A simulacrum of real fruit flavor? Because I was one of those people, until a few years ago, when I first tasted a Concord grape. It seems strange that I don’t have a specific memory of when that was–that’s how startling the flavor is–but I don’t. It was probably at the greenmarket, a sample taken from some farmer’s table, as they are not so readily available in your average supermarket, and due to their abundant seeds, they’re not the kind of fruit someone might just keep around as a snack. 

Img_1336

Anyway, at some point, I DID taste one, and said something ridiculous like, “Oh, my goodness, it tastes like grape juice!” Which is just like when I was visiting M. in Hamburg and looked at the stunning cloud formations hanging in the sky and said, “Wow, it looks like an impressionist painting,” and M., always a little more attuned to these things, responded, “Don’t you mean impressionist paintings look like this sky?” Touché, Fraulein Doktor Fulbright Scholar. (What’s German for “touché?)

So I knew what Concord grapes were, and knew what they had the potential to be in things like sorbet, courtesy of L. at a previous edition of Cook Club. But I had never cooked with them myself. And when a pound or so showed up with my fruit share the other week, it took me quite a while to decide on their destiny.

Ultimately, I settled on a pie. Because pie is generally the answer to every question, anyway. I nixed Martha Stewart’s recipe (even she makes a prickly comment about the number of hours it takes to de-seed the grapes for her version) and instead went to Joy. Because Joy is also generally the answer to every question. 

Start with about a pound of Concord grapes (which Joy refers to as “blue” grapes).

Img_1335

Squeeze each one out of its skin, into a pot, reserving the dark, dusky purple peels. 

Img_1337

Img_1338

Img_1339

This process gave me the distinct feeling that I was working with an alien creature. The peel comes off so easily, and it’s so surprising that the fruit inside is a slimy, gelatinous green mess–nothing like the outside. Looking at the pile of grape skins on my cutting board, all I could think of was that episode of Buffy where their eggs are secretly demon parasites. 

Img_1341

Now you’ve got a pile of empty grape husks, and a pot full of eyeballs. Or demons that are going to force you to kill your friends & dig a hole under the school. Either way.

Img_1342

If you want to flavor the pie with anything other than just grapes, now is the time to do it. I was inspired by this recipe and went with half a cinnamon stick, one piece of star anise, some black peppercorns, and lemon peel. I popped those aromatics in a loose-leaf tea bag and simmered everything together until the seeds started to come out of the fruit of their own accord.

Img_1343

Strain the whole mess through a sieve–

Img_1344

–and then add in the grape skins (chopped), some corn starch, a bit of sugar, and lemon juice.

Img_1345

Stir it all up and pour into a prepared tart crust. If you are feeling creative, you can do something other than a boring top-crust, or a traditional lattice. I decided to unearth my inner Martha and construct a bunch of grapes from the extra crust. I do recommend doing SOMETHING on top, though, because the flavor is quite intense and you need to up the crust-to-filling ratio.

Img_1346

Bake away.

Img_1347

And now let’s admire my handiwork again:

Img_1349

Concord Grape Tart
adapted from The Joy of Cooking (1943 edition)
makes a 9″ pie

1 batch of your favorite pie crust recipe (mine is Martha’s)
1 lb Concord grapes
spices (optional):

1/2 cinnamon stick

1 piece star anise

1/2 tsp black peppercorns

zest from 1 small lemon
1/2-3/4 c sugar
1 1/2 Tbsp lemon juice
1/2 Tbsp corn starch

Make your pie crust and stick it in the fridge while you assemble the filling.
Preheat the oven to 450F.
Squeeze each grape out of its peel, letting the fruit and any juices fall into a pot, and piling up the skins on a cutting board. To the pot, add the spices (if you’re using them) in a tea bag or wrapped in cheesecloth. Bring it to a simmer and cook until the seeds begin to separate from the fruit. Remove the tea bag of spices and strain the fruit through a fine mesh strainer into a bowl.
Chop up the grape skins and add them to the bowl, along with the sugar, lemon juice, and corn starch. Stir everything together and let sit while you roll out your pie crust. 
Line your pie or tart pan with the crust, and then pour in the grape filling. Create the top crust of your choice, and put your pie in the oven. After 10 minutes, turn down the heat to 350F and bake another 20 minutes. Let cool before serving, ideally with whipped cream, buttermilk sorbet, a spoonful of unsweetened applesauce, plain yogurt… (This tart benefits from a little something tart on the side.)

First Lady of Pie (or, First Pie of the Lady)

This was not my best pie ever, which is not to say that it was not enjoyed thoroughly.

Media_httpfarm3static_bbjcg

But see, it was the Friday before my first CSA delivery, and I was antsy for all things fresh, local, and seasonal. And there were these gorgeous strawberries and these huge bundles of rhubarb for sale at one of my favorite greenmarket stands. And so what if a nasty, early heat wave had only just broken and it was maybe warmer in my kitchen than you might want for rolling out pie crust? When pie beckons, you just have to answer. So I pulled out my trusty, only slightly altered Martha Stewart pâte brisée recipe (with 1 1/2 cups all-purpose flour and 1 cup whole wheat), and my gorgeous French rolling pin, and the damn thing just wouldn't cooperate. Even after sitting in the fridge for a good two hours, it was just too soft to roll properly. So I smooshed it together where it ripped, and patched it up with the scraps, and made a semblance of a lattice, and said no one would ever know the difference. Or at least, no one who was sharing the pie with me would say it out loud.

Speaking of people who were sharing the pie, while I was fighting with the crust, I had C. chopping up rhubarb

Media_httpfarm3static_tfeyi

and hulling strawberries

Media_httpfarm4static_narqi

which we tossed together with a little lemon juice, some cardamom, a lot of sugar, and quite a bit of flour. I neglected to add any cornstarch, which was probably my second mistake. 

Media_httpfarm4static_urfwc

But in any case, into the oven it went, with a little milk brushed on the lattice & some sugar sprinkled on top. We munched on the last of the crust scraps, dipped in cinnamon sugar, which is how we do it in this house. And about 40 minutes later, we had this come out of the oven:

Media_httpfarm4static_pbisj
The flavor, I concede, was fantastic, because it's really hard to screw up a strawberry-rhubarb combo. But even after being IMPOSSIBLY patient and letting the damn thing cool for a half an hour before cutting the first slice, it was still very, very runny. 

Ah, well, better luck next time, with apricots. Or peaches? What comes first?

Tart d’orange

Today, I met Dorie Greenspan. She and her son were running a pop-up cookie store (or, rather, CookieBar) in a salon on Park Avenue. Today was the last day, and I decided that I needed to jet uptown (all of 2 subway stops) on my lunch break. Sadly, they were totally sold out of cookies by the time I arrived, but still had some samples to munch on. So I got to try the espresso-chocolate shortbread, and the chewy chunky blondies. And I got to meet Dorie, and tell her how much fun I’m having with FFwD, and get a hint of what her next book is going to be (French pastries, anyone?), so on the whole, it was time well spent.

This week’s French Fridays with Dorie recipe is an orange-almond tart. I decided to make this as dessert a couple of weeks ago, served after the chicken b’stilla. It was a a very round meal, and a delicious one.

Media_httpfarm6static_zcmsh

As with many of Dorie’s recipes, it was much simpler in practice than it seemed on the page. As long as you have a food processor. I did a little prep work the night before, cutting out the orange segments, but with a good knife, it doesn’t take long. And then you wind up with a pile of orange peels that just cry out to be candied and dipped in chocolate (inspiration for that courtesy of Vanilla Garlic), so really it’s a win-win.

The crust is a snap–no rolling pin needed, even. I just pressed it into the tart pan and called it a day (after silently expressing gratitude, again, that I have a set of pie weights). I might press it in a little more thoroughly next time, though, because it was a bit thick around the edges. I made my own almond flour by blitzing some raw almonds in the food processor, and the filling came together very quickly.

If I were really smart, I’d have let J. arrange the orange slices. She’d surely have done it in a more meticulous fashion, though I think it turned out pretty well in any case. 

Media_httpfarm6static_xfvig

I do owe her for reminding me to dust the finished tart with powdered sugar. And I owe C. for splitting that second piece with me…

Media_httpfarm6static_iwcvu

Fear of Filo

Several months ago, Moody Food asked me if there were any elements that would instantly turn me off from a recipe. There’s not much I don’t like to eat (except smoked fish, and caviar), but I said that I do shy away from deep-frying anything, because it’s such a hassle to clean up. (Guests at my 2006 Superbowl party might not be aware that, after making up some wings from a pretty amazing Emeril Lagasse recipe, I proceeded to spill the–thankfully cooled–cooking oil all over my kitchen floor, while trying to dispose of it responsibly.) And recipes that call for gelatin (though I do love Jell-o). I also will generally skip past anything that calls for puff pastry or phyllo dough. Partly this is because, if there’s crust involved, I want to make the dough myself. And partly it’s because phyllo is notoriously a pain in the ass. 

This week’s French Fridays with Dorie recipe, a Moroccan kind of pot pie called chicken b’stilla, helped me get over my issues with phyllo. 

Media_httpfarm6static_zhlrq

Chicken b’stilla is not a simple recipe. Most of the dishes we’ve made from this book so far have caused me to think, “Wow, that was much easier/faster/less complicated than I was expecting.” Not so here. The chicken thighs must marinate for an hour. Then they simmer for another hour. The cooking liquid must be reduced enormously, and then turned into a kind of savory custard with beaten eggs. You’ve got to shred the chicken. And then there’s the phyllo to deal with. Thankfully, you can take care of the inside part a day or two beforehand, which I did. So when C. and J. were coming up for dinner on Friday, I just had the assembly portion to manage. 

I know I have cooked with phyllo before, because I have memories of ripping the stuff and getting cranky that it was all smooshed together in the package, and probably throwing some kind of tantrum that the finished dish wasn’t beautiful. It was probably a baked brie, and I probably got over it as soon as I took a bite, because, honestly, it’s baked brie, and you can’t really do it wrong. This time, I took a lot of internet advice and let the package defrost in the fridge over the course of 2 days. Then I unrolled the sheets, placed a sheet of plastic wrap on top, and then a kitchen towel on top of THAT. All of which seemed to do the trick, because the sheets came apart nicely and I had very few rips as I brushed melted butter onto each individual one and laid it into the baking dish. So the answer to phyllo, it seems, is patience and butter. Words to live by, truly. 

Then it was a matter of spooning in the filling, and topping with another 4 sheets, also buttered, stacked on top of each other, and cut into a circle. Sprinkle with cinnamon sugar, and bake until browned. I served it with an arugula salad from Bon Appetit, to which I forgot to add the mint. 

Media_httpfarm6static_hdpmj

C.’s response: “There are no words.”
J. went back for thirds.

Media_httpfarm6static_jhbhd

So in the end, I think this is not something to make very often, but only because of the prep time on the filling, not because of the dreaded phyllo. Bring on the puff pastry.

There Will Be Pie, part 2

The crust was ready to go, and the time had arrived to decide just what kind of pie to make for the dojo party. For me, certain pies are intrinsically linked to specific experiences. Apricot pie, for example, is best eaten at breakfast. (Or maybe I mean that the best breakfast is apricot pie… Remember, it’s a whole wheat crust–it’s just like having a bowl of oatmeal.) I made one once in collaboration with my sister (hi, Lindsay!), who had mailed me a jar of filling, made from apricots from her own fruit trees.

Blueberry pie, on the other hand, is an oddity for me. My strongest memory of eating it is as a child, at a neighbor’s birthday/July 4th celebration, and getting hit on the back of the neck with a stray spark from a firework. I have never had blueberry pie since then without thinking of that sharp stinging sensation. Now, I consider myself to be something of a blueberry expert, in spite of never having baked a pie with them. I know that most blueberries in this country come from Hammonton, New Jersey, right near where I spent every summer of my childhood. I have opinions about which brands are the best.

Media_httpfarm5static_idroq

You didn’t know blueberries had brands, did you? Seriously, though, a handful of these tastes like sunshine and salt air and the Pine Barrens. So I decided that I needed to create a new association for myself. And since I was already using Rose Levy Beranbaum’s cream cheese crust, so it made sense to use her recipe for Open-Faced Fresh Blueberry Pie, too. It is an unusual preparation to say the least.

First, you bake the empty crust, fully cooked through. Brush it with an egg white wash.

Media_httpfarm5static_jtdll

For the filling, only about a quarter of the blueberries get cooked, right on the stovetop, in a bit of water.

Media_httpfarm5static_otikk

Once the pot is boiling, add corn starch, sugar, and lemon juice.

Media_httpfarm5static_oxllf

Then turn off the heat, and fold in the rest of the berries.

Media_httpfarm5static_fwgax

That’s the extent of how much the berries get cooked.  Pour the filling into the baked crust, and let it sit for a couple of hours to set up.

Media_httpfarm5static_yhlqv

And that’s it! I was a little bit nervous about how it would turn out. A pie that doesn’t entirely go in the oven? A crust with cream cheese and vinegar? A pie without a lattice top?? But I needn’t have worried. It disappeared very quickly.

Media_httpfarm5static_rgxbw

There Will Be Pie, part 1

Fruit pies are one of my favorite things to make. Of course, I like other pies, too, and I like to bake many things, but fruit pies have long been a summer staple.

I’m the first to admit, though, that I tend to be very conservative with my pies. I might find myself singing the song from Waitress on occasion while baking one, but I do not get terribly creative with ingredients and names, like Keri Russell’s character does. Historically, the craziest I get is combining peaches and sour cherries (though take note that pitting a pint or two of sour cherries will make your fingers incredibly dry–those things are awfully acidic). I only do lattice tops. And I always use Martha Stewart’s pâte brisée recipe, my slight alteration being that I use 1 cup of whole wheat flour and 1 1/2 cups of all-purpose. (Because if it has whole wheat flour in the crust, then it’s health food, right?)

But every once in a while I like to branch out. And I had a package of cream cheese leftover from when I bought waaaaay too much for the frosting for the red velvet beet cupcakes. And when I was searching around for a good way to use it, I found this recipe for flaky cream cheese pie crust. And a party at the dojo this weekend was the perfect excuse for the first pie of the summer, as if I actually need a reason to bake a pie.

It’s not a complicated recipe, but the author is very specific about some of the steps, and rather than louse it up the very first time I try it, I figured I’d go by the book. The butter, flour, salt, and baking powder get chilled in the freezer ahead of time. Then you dump the flour et al. in the Cuisinart (using the metal blade, which surprised me–I usually pull out the pastry blade for pie crust).


Media_httpfarm2static_rbbnj

Add in the cream cheese and process.

Media_httpfarm2static_axnyt
 Then you take the frozen butter

Media_httpfarm2static_rcujj
 and dump that in, too.
 

Media_httpfarm2static_gdlne

Pulse until the bits of butter are about pea-sized.

Media_httpfarm2static_pbbjw
 The liquid ingredients are a mix of the usual ice water plus apple cider vinegar.
 

Media_httpfarm2static_uvtoy

They go in, too, and pulse a bit more.

Media_httpfarm2static_mjvsm


Pour out the dough (still very crumbly) onto a sheet of plastic wrap and knead it just enough to make it come together. If you’re doing a lattice or a top crust, you want to split the dough in two.

Media_httpfarm2static_otjqh

Stick in the fridge for a while, until you’re ready to roll it out. The rolling process is no different than a normal crust, but I will say that it was quite a bit easier to work with. I suppose the vinegar and the leavening make it a bit springy, or something.

Media_httpfarm5static_qbqjr

And there you have a lovely bottom crust, ready to be filled with whatever you like. (More on that in the next post.)