Marigolds

Several months ago, back when the sun was shining for 14 or 15 hours a day and I still had a normal 9-5 day job, I decided that my cookbook shelf was not quite full enough, and I treated myself to a copy of Tender: A cook and his vegetable patch by Nigel Slater. Slater is an icon in the world of British food writing. While I’d heard many wonderful things about him & his cookery books, I’d never actually explored his writing & recipes myself. But I can always use another resource for veggie-centric recipes, especially ones that are not strictly vegetarian (not remotely, in the case of this book). So room was made for this lovely, squat book on my shelf. 

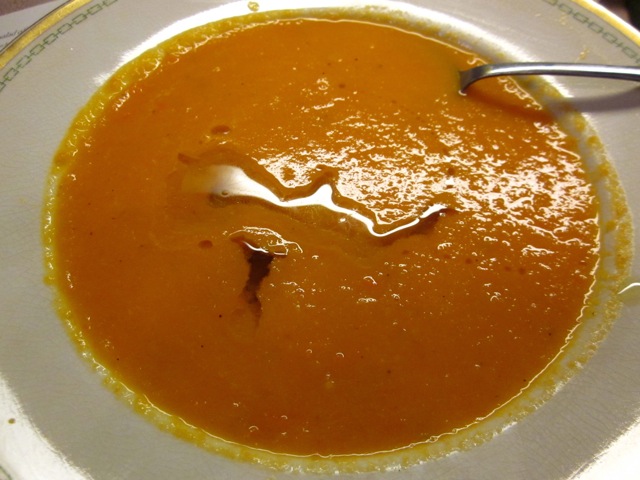
I’ve prepared quite a few of the dishes so far, and one of my favorites was this soup. The header reads “A soup the color of marigolds,” and the recipe is written as a single paragraph. I love this kind of recipe for its simplicity, and for its strict dependence on using the best ingredients. I don’t recommend making it right now (if you live in my region of the world) because you’d be hard pressed to find acceptable tomatoes of any shade, but if you reside in a different climate, or if you can wait until summer comes around again, I highly recommend it.

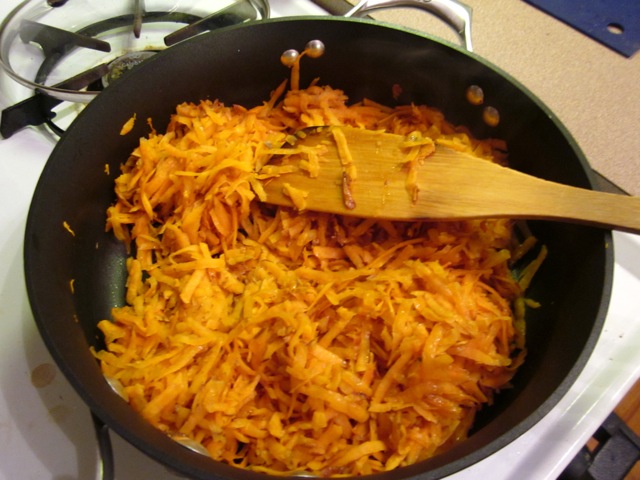
Start with a shallot, or an onion, or whatever’s handy, and about a pound each of yellow tomatoes* and carrots. Chop them all up, and cook the shallot in olive oil until it’s soft and going translucent.

Img_2421

Add the tomatoes and carrots, and stir them up a bit. Cook for a few more minutes.

Img_2422

Then add a quart of water, a couple of bay leaves, and salt and pepper.

Img_2423

Simmer for a half an hour, until the carrots are quite soft, then puree with the appliance of your choice.

Img_2424

My choice is the stick blender my mom gave me last year, which means I’m no longer in danger of spattering steaming vegetable matter all over myself & the kitchen when I’m too impatient to work in small batches in a regular blender. Feel free to keep the soup kind of chunky, or keep going until it’s velvety smooth–whatever is your preference.

Then just check the seasoning and serve. Slater recommends topping with chopped chives. Having none on hand, I drizzled a spoonful of good olive oil into the bowl.

Img_2425

It is amusing (to me) that some of the most compelling vegetable recipes I’ve found recently are coming from two non-vegetarian British cooks (Slater and Ottolenghi). Historically one equates British food with vegetables boiled into submission, served alongside some meat, or something fried. I like it when people defy expectations.

*You could, of course, substitute red tomatoes. I am not someone who thinks overly hard about presentation, but the color of this soup really is lovely with yellow tomatoes.

Throwing Things in a Bowl

“I don’t really know how this is going to turn out.”

That is a phrase that is heard rather frequently in my kitchen. Being a CSA member has helped boost my confidence in the kitchen when it comes to improvising. And I’ve also learned that vegetables that ripen at the same time, in the same soil, do tend to taste good together. Even so, it is usually with no small amount of trepidation that I translate, “Hm, what if I made tabbouleh with kale?” from passing fancy into lunch.

Usually, the process begins with perusing my cookbooks & googling the idea in question to see if I am treading new (scary but interesting) ground, or if others have provided a roadmap of sorts. And usually, it turns out that my ideas are not terribly original. Every vegetable-loving bloggerfood writer, and cookbook author worth her salt has already been there and done that. Especially when kale is involved.

So I poke around, confirm that I’m on the right track, get some hints as to ratios. . . and then I ditch all those recipes and start throwing things in a bowl. This sort of meal doesn’t usually wind up being photographed, because my assumption is so often that it will not be worth even putting on a plate, let alone sharing with the world at large. But sometimes I get lucky, and discover that oh my goodness, kale tabbouleh is quite good! The brightness of the parsley sort of shines over the earthy kale, and the contrasting textures of the cooked & raw greens are really nice. The cucumber is wonderfully crunchy against the chewy bulgur and squishy tomatoes. I do recommend eating this rather soon after it’s made, because the cucumber gets a little funny if too much time goes by. Not inedible funny, just not quite as crisp, as it absorbs the lemon & olive oil.

Kale Tabbouleh
serves 4 or so, as a side salad

1/2 c medium bulgur
1 c vegetable stock (or water)
1 large bunch of kale, stems removed
1/2 bunch of parsley (at least 1/2 c)
1 small tomato
1/2 small red onion
1/2 cucumber
2-3 Tbsp olive oil
1/2 lemon

Put the stock (or water) and the bulgur in a small pot together, and bring to a boil. Turn the heat to low, cover, and simmer until it’s tender, 15-20 minutes. (Alternately, cook according to the package’s instructions.) Dump it into a strainer and rinse with cool water. Transfer to a large bowl.

Bring another pot of water to a boil. Salt it generously, and add the kale leaves. Cook for just a minute or so, then strain them, too, and rinse in cold water. Chop the pieces pretty finely, and add them to the bulgur. Squeeze in the lemon and add the olive oil. 

Chop the parsley (leaves & thin stems only). Dice the tomato and the onion. Cut the cucumber lengthwise, remove the seeds, and dice it. Add all of these things to the bowl and stir. Add salt & pepper to taste. Best eaten the same day.

Beans on Toast, Haute Rendition

M. came up for dinner the other night, and there was a lot of talk (or, rather, gchat) beforehand regarding what exactly we would make. She has different points of reference than I do in the kitchen, and always seems comfortable just winging it. I’m happy to throw together random things in a pot when I’m the only one eating dinner at the end of the process, but if there are guests–even guests like M, whom I have known since birth–I usually want to be more by-the-book.* But wing it we did, and with fine results.

I had this massive bunch of Swiss chard in the fridge, which I lobbied pretty hard to have included in the meal plan. When your produce was picked just a day or two before it arrives in your kitchen, it tends to last longer than something you bought at Gristede’s. But even so, I’m trying to be smarter about using the more delicate & perishable items earlier in the week and saving the cabbage and other hearty things for the weekend. So I was inclined to use the chard sooner rather than later. 

I also had a can of chickpeas. And M. had a half a loaf of excellent bread she’d been given by someone that day. (This seems to happen to M. all the time, the receipt of random gifts of food. I wonder sometimes how I can reconfigure my life so that it is a common occurrence for me, too.) And since there are almost always tahini and lemon in my fridge, the conclusion was to make a sort of deconstructed hummus–chickpeas smashed lightly with a fork and dressed in my favorite tahini dressing from The Metropolitan Bakery Cookbook. Those we would spread on toast and top with some sauteed chard.

The end result was a wonderful, light summer dinner, which was almost impossibly healthy. But don’t hold that against it.

Img_2114

*It doesn’t much matter what book that is, however. Ottolenghi, Deborah Madison, David Tanis…

Chickpea & Swiss Chard Tartine
makes 6-8 little sandwiches

Tahini dressing:
(adapted from the Metropolitan Bakery)
1/4 c tahini
1/4 c warm water
1 Tbsp lemon juice
1/4 tsp sugar
1/4 tsp salt

1 cups chickpeas
2 Tbsp parsley, chopped
1 large bunch Swiss chard, stems & leaves separated
2-3 Tbsp olive oil
salt
lemon juice
3-4 scallions, chopped
6-8 slices good crusty bread

Whisk together all the ingredients in the dressing. Smash chickpeas lightly with a fork. Toss with the dressing and parsley. Let sit while you prepare the chard.

Dice the stems and cut the leaves into ribbons. Heat a few tablespoons of olive oil in a large skillet. Add the stems and cook until they start to soften. Add the leaves & a bit of salt. Saute until the leaves are cooked through and the stems are tender. Add the chopped scallions and a squeeze of lemon juice. Remove from the heat and taste for salt.

Toast the bread. Spread some of the chickpea mixture on each piece, then top with some chard. Drizzle with a bit more olive oil if you like.

Easy Breezy Summer Salad

Generally speaking, once the CSA starts for the season, I stop buying vegetables. Aside from some onions, probably (before they start showing up), the weekly delivery is enough for me. Partly, that’s a conscious effort to truly eat with the season–so no tomatoes in early June, no delicate lettuce in November. It’s a kind of discipline I impose on my kitchen for the 24 weeks of the harvest. But also, if I were to start buying sweet potatoes in July just because a recipe with eggplant (or whatever) calls for them, I would NEVER make it through the rest of that week’s share.

But a girl cannot live on leafy greens alone–one does need a little protein. So today at the greenmarket, on my way home from work, I treated myself to a pound of fava beans. And then I had to learn how to deal with fresh favas, which is not as hard as all that. You shell them, and then simmer for a few minutes, and then if they are small enough, Nigel Slater says you don’t even have to skin them. And even if they’re on the large side (most of mine were), they just pop out of the skins. If you have inherited your mother’s asbestos fingers, you can have a pound of them–which works out to about a cup–cooked and ready to go in 20 or 25 minutes. 

Slater also says that they go beautifully with mint, which I happen to have in my window box, and scallions, several of which were in my vegetable crisper, just crying out to be used. 

Img_2079

(Those are the pre-simmered, pre-skinned favas, for reference.)

Everything came together very quickly. I sauteed the summer squash in some olive oil, in two batches so it would actually saute and not steam. I tossed it all together with some sherry vinegar, the chopped mint and scallions, olive oil, salt, and white pepper. 

Img_2080

I served it to myself on top of some millet that I’d cooked earlier this week, which I admit was not quite right. I think it’d be great as a pasta salad. The rich texture of the beans makes up for the otherwise unforgivable lack of cheese. Though maybe it’d be even better just as a veggie side to whatever else you’re eating. 

Oh, it’d be great over polenta, too, which is now what I want, except that it is stupidly hot today and polenta is not something I make in the heat.

Summer Squash & Fava Bean Salad
serves not as many as you’d think

1 lb fava beans, shelled
1 lb summer squash
olive oil
4 scallions, sliced thin
1 Tbsp chopped mint
2-3 Tbsp sherry vinegar
salt
cracked white pepper

Bring a pot of water to boil. Salt it generously, and add in the fava beans. Cook them for 4-5 minutes. Drain, cool, and pop any large ones out of their skins. 

Cut the squash into bite-sized pieces. Heat a skillet with olive oil, and saute them, with a little salt, in batches if necessary depending on the size of the skillet. Add the cooked squash to the favas, and toss as quickly as possible with the vinegar. Add the mint & scallions, drizzle in some more olive oil, and season with salt & pepper to taste. 

Serve warm or at room temperature.

A Way With Greens & Noodles (2 ways, actually)

The first time I got mizuna in my weekly delivery, I made something with soba noodles and mushrooms and a miso-tahini dressing, and it was just not right. Too thick, too rich, too one-texture (that texture being “mushy”). I ate it, but mostly because I don’t like to waste things. I know was working from a legitimate recipe, not my own imagination (I didn’t yet have the confidence to wing it with an unfamiliar ingredient), but I can’t find it now to see if maybe I just did something wrong.

But moving on: this year, I decided that I’d been a little premature in abandoning the asian greens + soba noodles combination, and perhaps it was the dressing that was the problem. And sure enough, I’ve found a couple of variations that I can recommend. Hooray! It only took me 4 years to learn how to cook this stuff!

First, put a pot of water on to boil. Make it a big pot, even if you’re only cooking a smallish amount of noodles. Soba likes to have room, and then when it’s cooked, it likes to be run under cold water.

While the water is coming to a boil, take some mustard greens:

Media_httpfarm9static_egqms

or, you know, mizuna, if that’s what’s handy.

Media_httpfarm6static_ydxnb

Either way, chop it up and give it a quick saute in a hot pan with the oil of your choice.

Media_httpfarm6static_hdxjc

Add a little water, and either tamarind concentrate & smoked paprika*:

Media_httpfarm9static_jjghj

or some miso paste.

Media_httpfarm9static_mrolr

Cover up the greens and let them braise for a few minutes, just until they’re tender. Then toss them with the rinsed noodles.

Media_httpfarm8static_jhcdl

If you’re looking for something a little more filling, cut up a block of tofu into chunks and cook them in the rest of the braising liquid, a couple of minutes on each side. (I did this with the tamarind version but not the miso one.)

Media_httpfarm8static_ajrua

Add to the noodles & greens and enjoy.

Media_httpfarm9static_fguna

*The smokey tamarind variation is the second recipe that I’ve concocted based on a vague description in a New Yorker review of a restaurant I’ll never visit.


Soba Noodles with Mustard Greens/Mizuna

serves 2-4


1 package soba noodles (usually 8-10 oz, depending on the brand)

1 large bunch mustard greens or mizuna

1 Tbsp peanut or vegetable oil

1/4 cup water

Flavoring suggestions:

1 Tbsp tamarind concentrate + 1/4 tsp smoked paprika + 1/2 tsp salt

1 Tbsp miso paste

1 package tofu, drained and cut into pieces (usually 16 oz) (optional)


Bring a large pot of water to boil. Cook the noodles according to the instructions on the package. Drain and rinse well under cold water.

Chop the greens roughly, into 1-2″ pieces. Heat the oil in a large skillet and saute the greens for a few minutes, until they are wilted. Add the water and the flavorings of your choice. Stir, cover, and cook for 2-4 minutes, until the greens are tender. 

Remove the greens from the pan and toss with the noodles. 

If you’re using tofu, add the pieces to the skillet with the rest of the braising liquid. Cook for a few minutes on each side and then add to the noodles along with any remaining liquid that hasn’t cooked off.

Work in Progress

One of my favorite recipes from one of my favorite cookbooks is a lentil salad courtesy of The Metropolitan Bakery Cookbook, which was a gift from my dear friend M. many years ago. It’s not very complicated, but the flavors just come together perfectly–lentils cooked with turmeric, a bay leaf, & a cinnamon stick, tossed with a thyme-and-dijon vinaigrette and some diced & sauteed carrots and onions. 

This is how my brain works: 

As I was thinking of what to do with the mizuna & mustard greens I received this week, I remembered a bag of lentils I’d just bought, and wondered how those flavors would go together. And, hey, dijon mustard and mustard greens aren’t too far off from each other, are they? What if I adapt that salad somehow?

So I chopped up the mizuna & mustard greens together and put them in a pot with a little water & salt. Meanwhile the lentils are simmering like the original recipe, with a bay leaf, a cinnamon stick, and about a quarter teaspoon of turmeric.

Img_2053


Mustard greens, you should remember, cook down a lot, even if you just simmer them for a few minutes. This was two pretty generous bunches, which I drained, and tossed with some chopped garlic scapes, fresh thyme, coconut vinegar and coconut oil. (The coconut addition was inspired by the sweet potato/mustard green stew I made & loved so much.)

Img_2054


Then I tossed everything together, adjusted the salt & vinegar levels a little, and called it dinner. To my palate, the astringency of mustard greens needs something that can sort of flatten them out, bring them down to earth. Coconut milk does this very well, and so would eggs, I think. Lentils aren’t a bad choice, either. 

Img_2055


I’m not posting an actual recipe of this, because I’m not sure about it yet. The flavor combination is pretty good, but I think it’s too heavy, in a way, to be a main dish. A big bowl of it is just too rich, but maybe if it were served over rice? Or tossed with bulgur? Or use a softer lentil (one that breaks down more easily, like red or probably green) and shove it into a pita? I don’t know. But I’m getting mizuna & mustard greens again this week, so maybe I’ll try another variation and see how it goes. And if anyone’s got a suggestion, please comment.

Back in the Saddle

I was fully planning on trying a new recipe with the bok choy this week. I found one that sounded really good, made with fermented black beans. But it turns out I don’t know where to find fermented black beans. (That is not strictly true. I am quite sure that Kalustyan’s carries multiple varieties, but I didn’t have time to get there this week.) In any case, it turned out to be just as easy to riff on a familiar recipe I know from Deborah Madison. And as I’m re-learning my CSA habits after a 9-month break, it’s probably not such a bad thing to start off with something familiar.

Start with a pound and a half of bok choy.

Img_2044

Give that a good rinse, and while it’s drying, get some walnuts and saute them in walnut oil until they’re just golden.

Img_2045

Chop them up with a little salt and some crushed red pepper.

Img_2046

Then, since this is stir-frying, get everything else ready. Mince up some ginger. Chop up some garlic & garlic scapes. Cut the stems of the bok choy into 1-inch pieces. Stir a bit of cornstarch into a mix of soy sauce & water. 

Img_2047

Heat up the wok again, add a little more oil, and toss in the ginger and the garlic (but not yet the garlic scapes) and stir fry for a minute. Add the bok choy stems and the chopped up garlic scapes, plus a little salt, and keep stir frying until the veggies start to get tender.

Img_2048

Slice the bok choy leaves into thick ribbons, and add them to the mix with a little more salt. Cook another couple of minutes, just until the leaves are getting shiny & wilted. Then add the soy sauce/cornstarch/water mix. Keep stirring until it thickens up, then take it off the heat. Top with the toasted nuts and serve over rice.

Img_2050

Funny story about this recipe: the first time I made the original version of it, it was late June, and A. and I were living in a charming railroad apartment on 1st Avenue. Summer had very suddenly kicked in, and we’d finally bought air conditioners to put in the windows. We’d also bought tickets to see Charlie’s Angels, and in the brief window of time between hauling the A/C units home and getting back to 86th Street for the movie, we installed the damn things and made dinner in our no-longer-sweltering kitchen. But we didn’t have time to eat dinner, so we packed it up in tupperware and took it to the movies with us. I highly recommend the make-your-own-dinner-theatre technique. 

Img_2052

Stir-Fried Bok Choy with Walnuts
adapted from Deborah Madison
serves 2-3

1 1/2 lbs bok choy
3 Tbsp walnuts
1/4 tsp crushed red pepper
2 Tbsp minced ginger
2 cloves garlic, finely chopped
1 garlic scape, chopped
1 tsp cornstarch
3 Tbsp water
2 Tbsp soy sauce
walnut oil
salt

Heat a wok over medium heat, with 2 teaspoons of walnut oil. Add the walnuts, and stir fry until they start to color. Remove them from the wok, chop them up with the red pepper and a little salt, and set aside.

Separate the leaves and stems of the bok choy. Cut each pile into 1-inch pieces. Stir together the cornstarch, water, and soy sauce. 

Turn the wok to high heat, add another 2 tablespoons of oil, and when it’s hot, add the ginger and garlic cloves. Stir for a minute, careful not to burn anything, and then add the bok choy stems and garlic scapes with a little salt. Stir for a few minutes, until they start to get tender, then add the leaves and a little more salt. Keep stirring until the leaves are shiny & wilted. Add the liquid and cook until it thickens. 

Remove from the heat and toss in the nuts. Serve over rice.

Goodbye To All That

I am very clearly my father’s daughter. I’m my mother’s daughter, too, in a lot of ways, but if you ever see me and my dad next to each other, you’ll know exactly where I came from. Along with some obvious physical characteristics, I inherited an almost pathological love of cheese and a pretty serious cholesterol problem. (Love you, Dad!)

I’ve been ignoring my genetics for a little too long, or so my doctor informed me at my last check-up. But I’m solidly in my 30s now and have to face the proverbial music. What this means for the kitchen is that I can no longer rely on the formula of veggies + eggs = dinner. That is going to be the challenge for the year. Eggs are a good source of protein, they keep in the fridge for quite a while, and they cook up very quickly. That last point is especially useful when one arrives home from an evening at the dojo with low blood sugar and about 20 minutes to go until stomach implosion. But eggs, like cheese, butter, ice cream, and shellfish, have to feature a lot less in my meals going forward. Sigh.

Moving on.

Luckily for me, I enjoy eating vegetables (as you might have figured out by now). I don’t believe in veganism as a permanent way of life, but I do often wind up eating meals that include no animal products. This time, it was on purpose (the day after getting the results of my blood work).
Start with a big sweet potato and a bunch of asparagus, and maybe some garlic and ginger.

Img_1956

(The onion is a red herring.)

Oh, except really, you start with some couscous. Put a cup or so of dried couscous in a heatproof bowl, and stir in a little olive oil, salt, and chopped scallion. Boil a kettle of water and pour it over everything. Stick a plate on top of the bowl and then go about your business with the rest of the meal.

Img_1959

Now back to the veggies. Grate the sweet potato coarsely. Heat some peanut oil in a big skillet and stir fry with some ginger, garlic, and salt until it starts to get tender. You don’t want to overcook it, because it will get all mushy and then the texture won’t contrast with the couscous.

Img_1957

When the sweet potatoes have reached that sort of al dente stage, add in the asparagus, chopped into bite-sized pieces.

Img_1958

Stick a lid on the skillet to steam the asparagus, but again, watch the timing. Overcooked asparagus can be tragic.

Once the veggies are cooked to your liking, plate everything up. Big scoop of couscous (note that traditionally, couscous is served with a fork), couple big scoops of veg, and a few spoonfuls of harissa, or Tabasco, or sriracha, or vinaigrette…

Img_1960

This is a really fast dinner. Grating is a good technique to remember for root vegetables when you don’t have an hour to spare before you risk collapsing from hunger on the kitchen floor.


Sweet Potato and Asparagus Couscous

serves 3-4

1 cup couscous

1 Tbsp olive oil

2-3 scallions, finely chopped

1 large sweet potato

1 lb. asparagus, trimmed & cut into bite-sized pieces

1 inch fresh ginger, peeled & grated

2 cloves garlic, minced

1-2 Tbsp peanut oil

salt

Toppings: harissa; sriracha; Tabasco; etc.


Boil a kettle of water. Mix up the couscous with the olive oil, chopped scallions, and 1/2 tsp salt in a heatproof bowl. Pour about 1 1/2 cups of boiling water into the bowl, stir it up, and put a plate on top of it.

Heat the peanut oil over medium-high heat in a large skillet. Grate the sweet potato and add it to the pan with the ginger, garlic, and a little salt. Stir fry for a few minutes, until the potato is starting to soften. Add the asparagus pieces, stir, and put a lid on the pan until everything is just tender.

Scoop some of the couscous into a bowl, and put some of the cooked vegetables on top of it. Dress it with the sauce of your choice.

Harissa-holic

I am capable of eating embarassing quantities of hummus. It is my preferred pre-dinner snack on those nights when I think my stomach is going to implode before I get a plate of food to the table (a frequent occurrence if I come home from the dojo and there are no leftovers). It is a perfect combination of rich and salty and tangy and sweet, and I wasn’t even looking for something to replace it when I found this recipe for carrot puree. Which in addition to being rich and salty and tangy and sweet is also a full serving of vegetables. Or multiple servings, if you power through as much of it as I did.

Admittedly, it doesn’t sound exciting. It’s basically spiced mashed carrots. But look closer, and you’ll see that the spice in question is harissa, and that makes all the difference. And if, like me, you like to keep a jar of harissa in the fridge at all times just in case (there are plenty of emergency situations where that stuff comes in handy), you can have this on the table in about 25 minutes.

Start by pretending you’re making mashed potatoes, except that they’re carrots you peel & toss in a pot of salted water.

Img_1691

Simmer until they are soft, then drain and put back in the pot. Heat them in the dry pot until the water on the outside of the carrots has mostly evaporated. 

Img_1692

Then add in the seasoning: olive oil, white wine vinegar, harissa, ground cumin, and ground ginger. Play around with the ratios. Not surprisingly, I prefer more harissa and less oil and vinegar than this recipe calls for. 

Img_1693

Then get out your potato masher and mashmashmash. (My double-masher is fun and quick to use, but sadly more difficult to clean than a single-layer one.)

Img_1694

Taste it to adjust the seasoning as you see fit, add salt and pepper, whatever. 

Img_1695

It is wonderful on a cracker, or bread. Or pita. Or maybe get all meta and dip a carrot in there. Or just a spoon.

I was out of shredded coconut (tragedy!) when I made this, so I have yet to try the dukkah spice mix that is meant to accompany this. It sounds wonderful, but frankly, I can’t imagine that my enjoyment of the carrot dip could possibly be raised to a higher level. 

Side note: when the Flyers make it to the Stanley Cup Finals and my friend J. and I make a hockey version of the snackadium, this would be perfect for some element of that. 

Couscous

About a year ago, a reader suggested that I check out a recipe in Yotam Ottolenghi’s book Plenty for something he calls Ultimate Winter Couscous (also available on his blog on the Guardian). Well, it took a while for me to get around to it, but I finally made it for dinner a few weeks ago. It should come as no surprise at all that it’s another winner. I admit, the ingredient list is a bit long. But if you are someone who cooks a lot, chances are most of these things are in your pantry anyway. And if they’re not, then this is an excellent excuse to go out and buy some saffron and preserved lemons, and to make up a batch of harissa

Start with a roasting pan, with chopped carrots and parsnips, peeled shallots, cinnamon sticks, star anise, bay leaves, ginger, turmeric, paprika, and chili flakes. Toss with olive oil and salt, and roast in a moderately hot oven for 15 minutes.

Img_1663

Add some cubed winter squash, and stick it back in the oven for another half hour or so, until the veggies are tender.

Img_1664

While that’s doing its thing, get the couscous ready. Mix the dry couscous with a pinch of saffron, salt, and olive oil in a big bowl. Pour boiling water (or veggie stock, if you’ve got it) over it, stir it up, and stick a plate on top of the bowl until the water is absorbed, about 10 minutes. Stir in a little butter and put the plate back on top until you’re ready to serve.

Img_1665

Add some chopped dried apricots, cooked (or canned) chickpeas, and some water (or the chickpea cooking liquid) to the roasting pan and cook another 10 minutes. 

Img_1666

Just before serving, stir in some harissa paste and chopped preserved lemon skin into the veggies. 

Img_1667

Serve a couple of big spoonfuls of the vegetables over a plate of the couscous, and top with a lot of fresh cilantro.

Img_1668

It’s a very flavorful dish without being overwhelming, and filling without being too rich. It may no longer be winter, technically, but the pickings are still pretty slim at my greenmarket, so a dinner based on root vegetables and legumes isn’t out of the question just yet.